Print Friendly and PDF

Sunday, November 4, 2012

Kobacha Squash Soup

In an attempt to use some of this yummy fall produce in front of me on the counter, I decided to pick up the kobacha squash and think of what to do! With a wife that loves soup, and some extra red skin potatoes and mushrooms on hand, I decided to go for a nice squash soup with roasted mushrooms and potatoes. As a bonus, I also wanted to use this cool squash as the bowl.

Before I started with the squash, I cut up 4 redskins, and prepped about a pint and a half of button mushrooms (I left them whole). Tossed them with some salt and olive oil and put them in the oven at 400 for about 25 minutes ... meanwhile,  I prepped the squash.


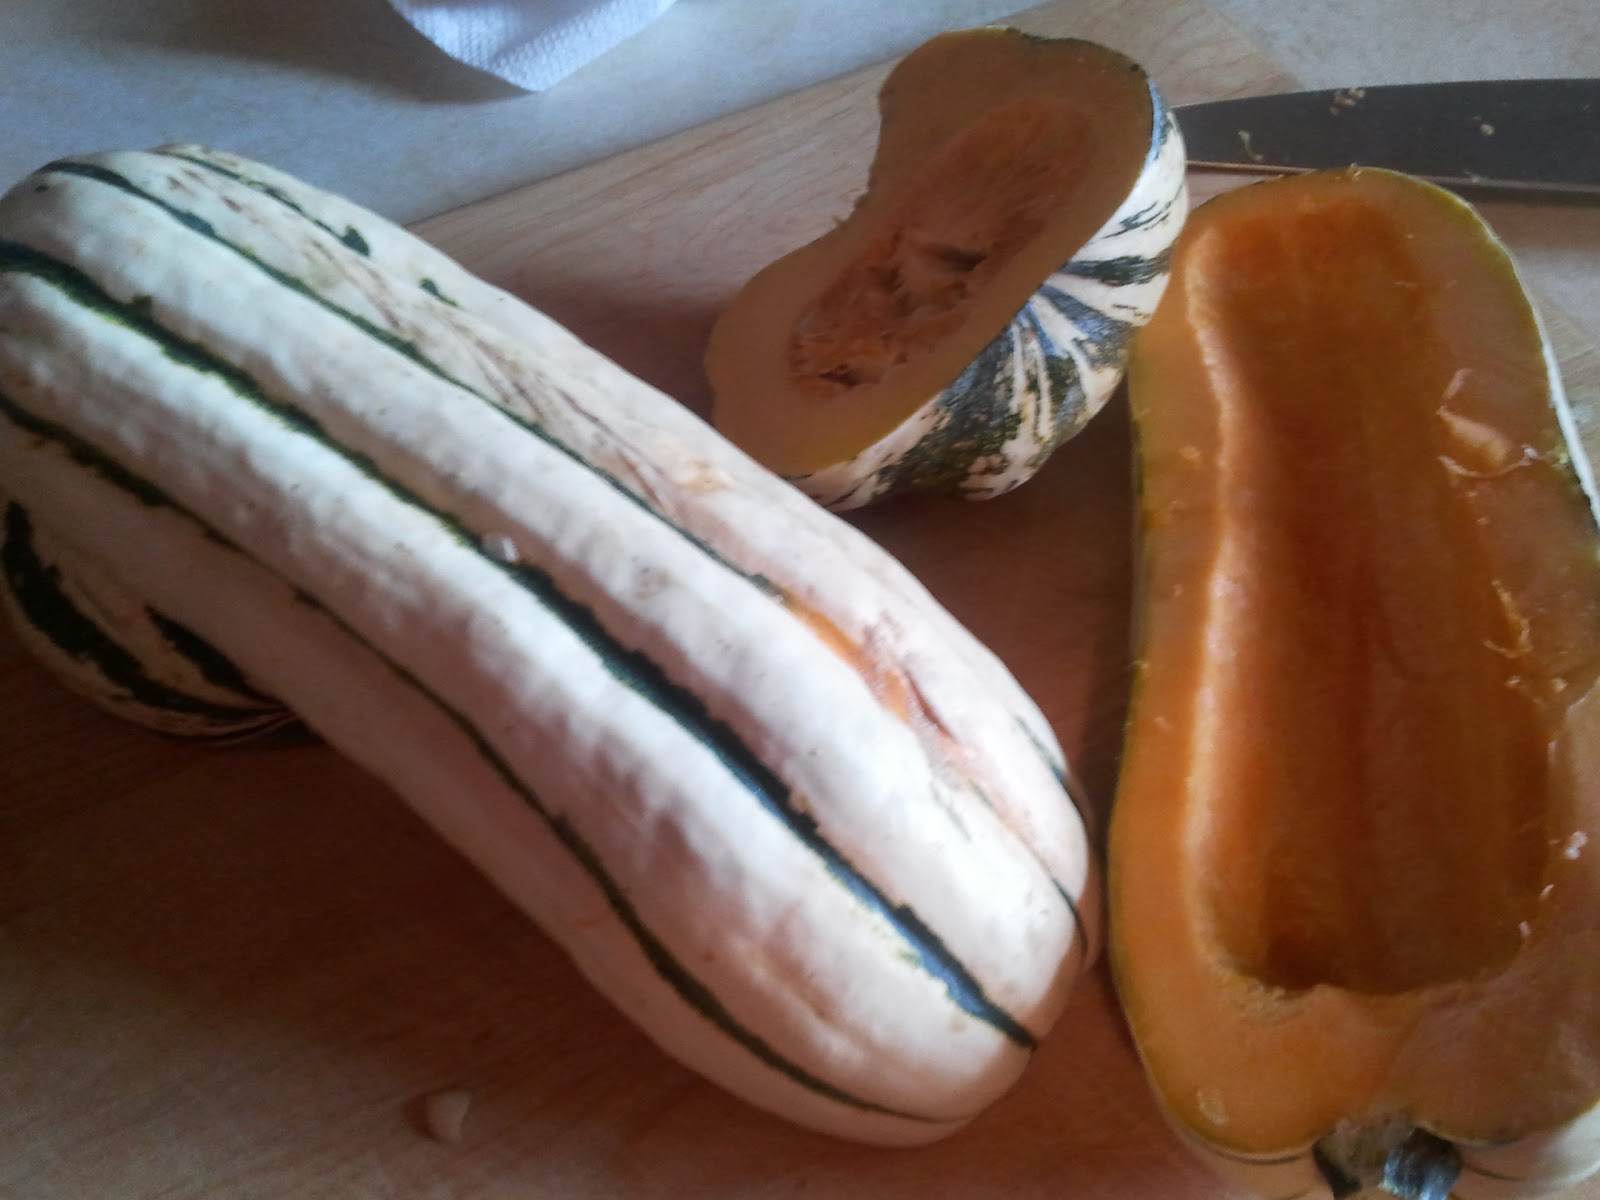
I cut a thin slice off the top and bottom of the squash so it would sit flat, and then proceeded to gut it. I cored out the seeds with a spoon, and then tried a couple different methods to scrape the squash out of the shell (leaving some of it intact for the bowl).
 
One of the halves I simply used a spoon and knife to scrape/chunk out the flesh while still raw. Not easy, but it worked. The other half I put upside down in a dish of water and cooked it on high in the microwave for about 4 minutes. My only concern was that the microwave method would render the shell too soft to use as a bowl. However with the short cooking time it was fine, and will be the method that I'll use again in the future. If it's too hard to scrape out, stick it in for another minute at a time, but just make sure you don't overcook the shell as you want it stable for the bowl. I found that if you leave about a quarter inch of squash in the bowl it will give it enough stability for serving.
 
I took what I scraped out, put it in a small saucepan without about 2 cups of chicken stock, and cooked it until the squash was soft enough to puree (I used an immersion blender to accomplish the task as it's the best tool for the job in my opinion). Once it was reduced a bit (about half) I did end up using some cornstarch/water to thicken it. Seasoned it to taste and I was ready to put it all together.


Once the mushrooms and potatoes were ready, I placed some of each of them in the bowls. Then filled them with the squash soup and topped them with a little greek yogurt and some freshly ground pepper. I placed the extra mushrooms and potatoes out on the platter and served!
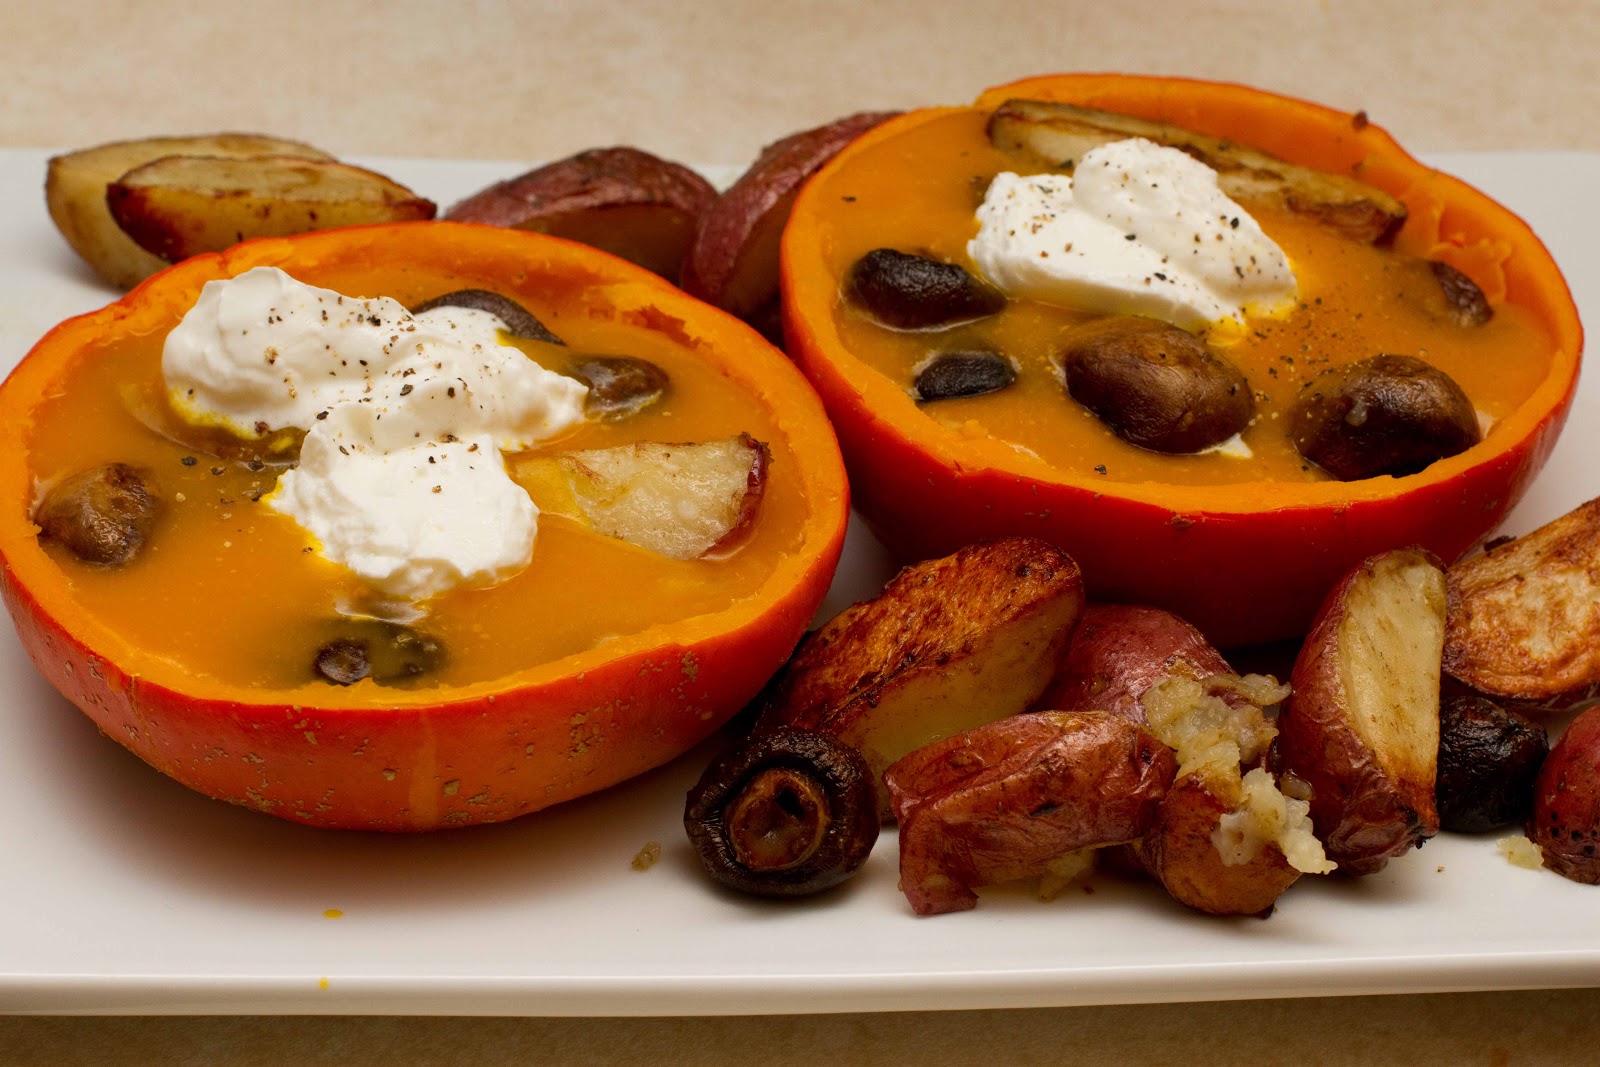


DELICIOUS!
 
Happy eating,
~Matt
 

Friday, November 2, 2012

Kale Chips


In the last few weeks, I think about 6 people mentioned Kale Chips! I finally had to try them out myself. There seem to be multiple methods to cooking them but I decided to try this and they came out great! First of all, I decided to try this out with some baby kale I got from Organic Girl. Trimmed, washed, and ready to go just made this 'trial job' a lot easier. (If you plan to use regular kale on the stalk, just rip the leaves off, chop them into large sizes, and use the same method, but you may need to adjust the cooking time).

 
My wife also heard Rachel Ray mention that she liked using fresh grated nutmeg so I thought I'd give it a whirl too.
 
 
So to get started, get your oven up to 300 degrees.
 
Meanwhile, take the kale (I used 6 cups of baby kale) and toss them with 1 tablespoon of olive oil, 1/4t salt, and some grated nutmeg until nice and coated. Then I spread them out on a cookie sheet with a cooling rack on it (to keep them off the bottom in order to cook/dry more evenly)
 

At 300 (with the convection fan on) it took about 30 minutes. I have seen other recipes broil them, and while likely quicker, I think 300 is great as it is very forgiving with regards to timing. I checked them after 30 minutes and they still needed a bit more (of course this depends on the type, amount, etc.) so I put them in for another 5-10 minutes. At 300 I wasn't too concerned about them quickly burning on me, so I may continue to use this method.
 
Once they are dry and crispy to the touch, you can take them out and they should look something like this.
 
 
They easily slide right off and you can set them in a bowl and start munching! I would recommend you put them in an airtight container and keep for a few days, but I doubt they will make it an hour! :) Enjoy!


Thursday, November 1, 2012

Roasted Pumpkin Seeds

So you carved your pumpkins and you likely are left wondering what to do with the seeds right? You know you want to roast them, but it just seems like a task not worth completing, right?
 
What? You threw them away? Tell me you did not!

Oh, you were joking ... good ... phew! Then let's chat! It's actually super simple. First all you have to do is rinse them, pat them dry, and lay them on a cookie sheet in a thin layer. Don't go too crazy worrying about the pumpkin bits. They come off real easy, but a few pieces here and there are fine. You do know it is a squash right? Eating it is an option! :)
 
 
Spray the pan with non-stick spray (I didn't use oil to keep it even more healthy), and sprinkle them with some salt (or other flavors if you wish). I had two batches, and one I make with salt and my homemade chipotle! (http://greatfooddaily.blogspot.com/2012/09/smokin-hot.html)
 

Just throw them in a 325 degree oven, take them out after 10-15 minutes, spray again, and toss them around, and then put them back in the oven for another 15 minutes or until they look like this! Yumm! 


Oh, and bonus, you get to have cool looking pumpkins too! The more you carve, the more seeds you eat! Happy Halloween! =)
 

Chili Lime Avocado

 
This is one of my favorite quick, healthy, and filling snacks. I first saw it on Rachel Ray (at least I think I did), but all you do is split the avocado, score it with a knife (checkerboard pattern) and squeeze in some lime (and I've used lemon before too) juice as well as sprinkling some chili powder on top.
 
Let it sit for about 20 minutes and dig in. I usually split it with my wife, but could easily eat the whole avocado! Not super low-cal obviously, but your body will be much more thankful for this than a Snickers! Enjoy!
 
~Matt

Monday, October 29, 2012

Parsnip Chips!

Parsnips. Those carrot looking things that have always seemed to elude my grocery cart. However, being part of a mail-order produce co-op it gives us the chance to try different things (though I'm not sure if Parsnips are really all that different). To us however, they were a first!

I wanted to do something somewhat different so I decided to check Pinterest for some ideas, and right away the concept of making them into a fried chip popped right out! High in fiber, and seemingly better than a potato, I thought I'd give it a whirl!

Not much of a "recipe" to share, but I peeled them, sliced them in my madoline, and fried them up! Shortly after coming out of the oil I sprinkled some kosher sale as they were on a paper towel.

Note: These cook quick! Just 10-20 seconds change them from golden brown to overdone, so do keep an eye on them!


Clearly a winner, absolutely delicious. Some of the thicker cut ones almost were a bit soft in the middle and the sweetness made me think of sweet potato fries! So for thick fries, or thin chips, check out the Parsnip!

~Matt

Monday, October 8, 2012

Rainbow Pork?

OK, well not quite rainbow pork, but I did have those rainbow carrots, some red cabbage, a pineapple, and a pork tenderloin on hand (oh, and some bacon!). I thought about doing a kabob, but since I couldn't find my kabob skewers (and my rosemary is gone), that idea ended quickly!

I started about by prepping the carrots for roasting. I wanted them to roast evenly so for most of them I cut in half, and then took the thick end and halved that. Some olive oil, salt, pepper, is all I wanted as I really wanted to taste the carrot as I've never had these before. I left some of the greens on because they looked nicer and the tops are actually quite yummy!


Next I used a half of a head of red cabbage chopped roughly, with a diced yellow onion and set it aside ... fast forwarding ahead, Sabina (my 6 year old) said she loved the cabbage!


Next, my wife had already cut up some pineapple, so I took that pork tenderloin, butterflied it a bit, and rolled the pineapple inside it (and then tied it up with some twine). The pork was actually a store bought pre-marinated tenderloin so that made things a bit easier.

Then I just got a nice browning on the pork, and threw it in a 375 degree oven until it was cooked through.

 
Once the pork was about done, I rendered a couple slices of bacon in a skillet, cooked the onions down, and then the cabbage until soft (but not mushy). That took about 10 minutes. Once done cooking I drizzled in some real nice balsamic vinegar (about 3 Tablespoons) and tossed the cabbage mixture to coat it.
 
Finally, I just took the cabbage, laid it down on the platter, with the roasted pineapple pork, and carrots and brought it all to serve! Colorful and Delicious!
 
It was another meal worth a repeat, though the way I randomly cook it may be 3 years down the road! However, the carrots are a keeper. They looked beautiful, and we all could tell the difference in the carrots! The red ones were the sweetest by far! Clearly these roasted rainbow carrots are a great side to bring at a gathering! Enjoy!


Thursday, October 4, 2012

Wasabi & Maple Chicken ... with Bacon!

Everything is better with bacon right? Reminded me of this meme ... Ha! :)
 
 
So I was thinking of a camping trip I took with my girls and the food I had. My friend took pork tenderloin and marinated it in a wasabi sauce, and then grilled it. It was delicious! So I thought I'd try to go for my own version with what I had in the house.
 
I simply took some chicken breast, chunked it up into about 2" squares, and soaked it for a few hours in a marinade of wasabi, pure maple syrup, soy sauce, and olive oil. Make it to your taste, especially with the wasabi, but not to worry because the heat form the wasabi won't transfer as much as you think. Also, use honey if you don't have the maple syrup, I just thought it would go well, especially with the bacon.
 
Once marinated, I took each piece of chicken and wrapped it in a slice of thick cut bacon. Not only simply because bacon is awesome, but it would help keep the chicken breast moist since it was skinless (oh, I didn't say that) :)
 
 
I put it on a cooling rack and placed it on a baking sheet to keep it from sitting it it's own oil, and put it in at 375 (with the fan) until golden brown (about 30 minutes).
 
 
They came out very good, the marinade was great, and the bacon did indeed keep it moist. If I had to do it over again, I'd bump up the temp to about 425 to get the bacon extra crispy without overcooking the chicken. I served it with a nice antipasto salad and was good to go!
 
 
Make again? Absolutely! I just plan to kick up the temp as I mentioned but certainly worth trying out yourself ...
 
Hungry,
~Matt


New Stuff ...

So my weekly produce delivery (from Door to Door Organics) arrived with a few new items that I've never tried! Always fun (for me!) to try new things.

First, Kiwi Berries! I've never had them, but was excited to try them whatever they were. Apparently they have more nicknames than seeds, and aside from looks and taste (which is pretty significant if you ask me) aren't a kiwi at all. Just a similar looking berry, and I will say similar tasting too. Most of them went with my 1st grader to school as her healthy snack, but I did manage to try a few before they were gone and would certainly try them again!


Next, rainbow carrots! I have yet to cook them, but will be sure to let you know how they come out. I think they look pretty neat, and as someone who likes to present food well, even if they taste the same, it makes for a nice presentation! I will let you know for sure, and I even plan to have my wife help me with a blind taste test so I can subjectively report back! :)


Finally, there were a couple new squash that came in the box. They both look the same with respect to color, but the long one was called a delicata squash, and the other was called a sweet dumpling squash. While the name delicata sounds awfully familiar, I clearly have not had anything that had this color pattern, but hey, it's a squash! :)


The squash however became one of the 4 meals we made for Rebekah that day to freeze, so while I got a taste (and it was good, not as sweet as a butternut, more like an acorn) it was all for her, and she wanted to help make it too! :)
 
Roasted in the oven in a water bath, and scooped out into the ice cube trays for easy serving sizes! =)


So all in all a fun delivery with a few new items! Have you ever tried any of these? I would love to hear your feedback! :)

~Matt
 

Saturday, September 22, 2012

Kale Omelet!

Kale is packed with nutrition, but with it being such a hearty green, I am still learning new ways to use it. This morning I decided to introduce my omelet to my new found friend kale!


I cooked down the kale in some olive oil until mostly tender (only took about 5 minutes). I also decided to not add any salt. I need to cut back on that stuff, plus the cheese should have plenty of sodium to balance the dish out anyway.
 
 
I whisked a couple eggs, a tablespoon of milk, a very small dash of salt, and let the eggs cook until almost firm.  Then I added the cheese and cooked kale.


 Flipped the egg over, let it cook another minute, and served it with my favorite breakfast accompaniment, coffee! :)


 Great start to my morning ... and as I write this, Rebekah just dumped a cup of (cool thankfully) coffee over our bedroom carpet! Guess today is carpet cleaning day! =)

Cheers,
Matt

Friday, September 21, 2012

The Eggplant Situation!

So there it is, that eggplant, staring at me. I don't love it, I don't hate it, and that's the problem. I seem to always want to try it, but it has about a 50% consumption rate at my house because half the time I seem to wait too long, and then unfortunately they find themselves in the rubbish bin.
 
 
So I gathered together some things that needed to get used before they found a similar fate. The eggplant of course, a spaghetti squash, bok choy, some extra rosemary, chocolate cherry tomatoes, and a lonely cucumber. However, the cucumber and tomatoes made it off the chopping block today but will lose the battle tomorrow with one of my favorite simple side dishes, and that's a cucumber and tomato salad.


Step one? Get that spaghetti squash cut in half, in a baking dish with about an inch of water, and in the oven! That's my bottleneck ... 375 with the fan on, and let it go ...

On aside, I found it fascinating that I use my chest muscles to do just about everything, including cutting a squash in half! I recently had a rib injury and it was quite the project to cut this thing in half without finding myself in pain! But anyway ...


Now that the squash is in the oven, time to chop up the eggplant and bok choy. I separated the bok choy green leaves from the more hearty stems as they vary in cooking times and I didn't want the greens to get too mushy.


After about 20 minutes the spaghetti squash was, well ... it wasn't hard anymore! So it was time to get moving. So I got some olive oil in the skillet (and for the record I cook in cast iron more than half the time, because, well, it's amazing!), and started to cook down the eggplant and white parts of the bok choy. I added some salt, pepper, the rosemary, and a little chili powder. However I did reach for a few drops of my black truffle oil since I didn't have any mushrooms on hand and I thought it would give it a good earthy taste. Made a nice difference.

I would say I cooked them down a good 10 minutes, and then just when the got tender, I added the bok choy greens, and cooked them just another minute or two more ...

 
Once that mixture was done, off the heat it went and got placed into a bowl on the side. I then pulled the cooked squash out of the oven, cut it up, and plated it with the eggplant and bok choy "filling", and I have to say it was pretty good. I tend to be a bit of a tomato sauce person so I added some on the top (the eggplant parmesan won't let me go) but my wife could have done without that.


Kids? Well, they ate it, but I didn't hear any cheers from the crowd however. Though my son did comment that the eggplant "wasn't bad" so I guess that's a small victory! Just another typical make-shift dinner over here. The best part is I got to use my bok choy, eggplant, and squash all in one sitting!
 
Happy Cheffing,
Matt

Thursday, September 20, 2012

Ka-what? Ka-bob!

So I decided to try something I've always heard of, rosemary kabob skewers!

So I went to the garden and harvested some of my fresh rosemary. Stripped the leaves (to use for the marinade!) and make an angle cut to help it push better through the chicken.

Since I happened to have an acorn squash on hand, I cut it in eights, seasoned it up with some salt and pepper, and threw it in the oven to roast as a side.


I used a pretty basic marinade of olive oil, rosemary, chili powder, honey, and a little soy. The chicken made it on the rosemary stems pretty easily, and I fired up the grill!


Once the squash was close to being done, I threw the kabobs on the grill, and made a little wasabi-mayo for a sauce, and served it wish some tortillas. Easy, quick, and delicious! :)

 
Not really sure if the rosemary skewers made a difference but it make for nice presentation and a great aroma! =)

Happy Eating,
-Matt

Smokin' Hot!

For those of you not familiar, if you ever ate anything that had chipotle in it, it's a smoked hot pepper, specifically jalapeno (although the word chipotle simply means smoked chili pepper). Well this year in my garden my cayenne peppers were finally ready to harvest. I love hot peppers, but I wasn't about to eat about 20 peppers before they all went bad, so I had to think of my options.

I could make and jar some homemade salsa, freeze the peppers for later, or maybe even dehydrate them. However I wanted to do something different this year, and not just dehydrate them. So my decision; smoke 'em! Time for some homemade cayenne chipotle seasoning ...

I decided to halve them rather than smoke them whole. I really wanted to get the flavor into them since I will likely only be using a small amount each time. I just wanted to make sure that the smoky flavor ran deep ...


I then soaked my wood chips (hickory this time) and got out my trusty Little Chief electric smoker!

I've often thought about upgrading to a larger smoker, but there is something about using a small electric smoker that I really love. It's easy, quick, and consistent on temperature with very little maintenance. I plan to build myself a larger smoker one day, but for now, this little jewel will do just fine!


It took a little longer as it was a bit breezy, and I had to drop them to the lower rack after a few hours (total time in the smoker, but not always smoking, was about 6 hours). Once they were done, this is what they looked like. I didn't want them burned, but I certainly wanted them completely dry for grinding ...

(looking back, I think I'll just put them inside the garage to keep them out of the breeze to keep the temp up ...)

*** WARNING *** When grinding, please be cautious of the dust! It's not "hot", it's actually quite uncomfortable (and I would think dangerous). I happened to get a very small whiff of it in when I opened the lid and was almost gasping for air! I kid not! Be careful!

 
After grinding I decided to take it and put it in an old medicine jar (with the little ones around it's safe, and perfect for storage).


Results? Smokin' Hot! The ground peppers are extremely hot, but have a deep smoke flavor, exactly what I was hoping for! A repeat for sure!

Looking forward to getting some fresh salsa and putting in a dash of my own hot chipotle. This is going to be good!

Happy Cooking!
-Matt